A316
| A316 | |||||||
| Location Map ( geo) | |||||||
| |||||||
| From: | Chiswick (TQ214785) | ||||||
| To: | Sunbury (TQ097697) | ||||||
| Distance: | 9.2 miles (14.8 km) | ||||||
| Meets: | A315, A4, A3003, A205, A307, A3004, A310, A305, A312, A314, A308, M3 | ||||||
| Former Number(s): | B355, A305 | ||||||
| Primary Destinations | |||||||
| Highway Authorities | |||||||
| Traditional Counties | |||||||
| Route outline (key) | |||||||
| |||||||
Route
The A316 forms an important strategic route in South West London, linking the A4 at Chiswick with the M3 at Sunbury. Its name is the "Great Chertsey Road", although as Chertsey Roads go, it's not very Great—it doesn't actually go to Chertsey! (After it becomes the M3, it passes through Chertsey though you can't get off…)
Most of it was pushed through in the 1930s as part of a grand arterial roads programme. The first section past Chiswick was the only part of the route to have the A316 number - and even this was under construction in 1922. Further west the A316 has taken over the B355 in Sheen and the A305 west of Hanworth.
Chiswick - Sunbury

The A316 starts on Chiswick High Road (the A315), at a signal-controlled junction. The road down from here to the A4 is short and quite unassuming (and the only non-primary section of the A316), but things change dramatically when we reach the Hogarth Roundabout on the A4 at Chiswick. Fuller's brewery sits next to the roundabout and there are often brewing smells emanating from it — some pleasant, some not so pleasant. Eastbound A316 traffic wanting to use the A4 eastbound can use the scary flyover over the middle of the roundabout to save waiting at the traffic lights. This flyover was built in 1969 as a temporary measure pending further road building. However, the roads never materialised as the grand plans for London's major roads were dropped, and the flyover lives on (apparently its intended lifespan was five years!). It's one lane only, and only cars and two-wheelers are allowed to use it. That doesn't stop others trying, however, and there are often paint marks on the width restriction bollards....
The next bit of the A316 is a narrow bendy road (Burlington Lane) skirting the grounds of Chiswick House. Burlington Lane then turns off to the right, and we are now on Great Chertsey Road proper - which strides purposefully into the distance. Here, as for most of the distance, the A316 is wide (a 4-lane single carriageway) and tree-lined, reflecting the aspirations of the 1930s planners.
There's a slight slope up to get over the railway line (and a slight bottleneck as the four lanes are reduced to three), then the view opens up—we can see the church on the hill in Richmond straight ahead of us—and the speed limit increases to 40 mph. Here, incidentally, is the end of the 1922 route of the A316.

The A316 crosses the Chiswick Bridge (the finish line for the annual University Boat Race), which was opened in 1933. Apparently, it was designed by Herbert Baker and faced with Portland stone.
We descend into Mortlake and Sheen, and a 30 mph limit, meeting the South Circular Road at the busy signal-controlled Chalkers Corner junction. Here, the new-build 1930s section of the A316 stops for the moment, and we hijack the Lower Richmond Road. It's worth remembering that the Lower Richmond Road is above the Upper Richmond Road — when you look on a map! Of course the Lower and Upper refer to the lie of the land.
The road is dual 2-lane at this point, until Manor Circus, the next major junction, which is quite a small roundabout made busier by the hulking great Sainsbury's next to it. We follow the A316, now Lower Mortlake Road, to Richmond Circus, the junction with the A307. This is more or less a signalised roundabout junction now, although there are a few odd priority quirks remaining from the old days (the A316 would have had priority throughout the junction).
Then to more 1930s 'new-build', continuing next to the Old Deer Park. It looks lovely down here in the late spring due to the blossom on the trees beside the road. The speed limit goes back up to 40 mph. We now pass back into Middlesex over Twickenham Bridge, another built especially for the arterial road. This concrete bridge was designed by Maxwell Aryton, and has distinctive bronze lamps, still in use (though they were joined by massive light columns too, in the 1960s by the looks of things).
At the bottom of the bridge, there's a sharp right-hand bend as the route hijacks another street, and we reach the first in a series of three roundabouts, serving Twickenham and Isleworth. These can have heavy queues during the peaks. Soon, the behemoth that is Twickenham Rugby Ground looms into view on the right (just by Whitton Road roundabout).
After Whitton Road, the A316 becomes dual 2-lane again, though still at a 40 mph speed limit. After crossing the railway line, there are houses on either side, though with separate service roads. We then reach Hospital Bridge Roundabout, also signalised, which always sounds to me like a version of "Paper, Scissors, Stone". Let's see now: bridge spans roundabout, roundabout encircles hospital, and... er, well the third link's always going to be tenuous.
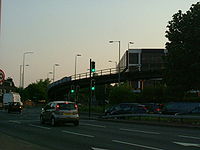
After that, the road opens out quite a lot, and we have the last of the roundabouts behind us. The speed limit increases to 50 as we zoom over the flyover at Apex Corner (where the A312 and A305 join us; not to be confused with the junction of the same name in Edgware) and the road widens to dual three lanes. The next stretch is very ugly to my eyes: the flyovers are 60s-70s style with that distinctive parapet design, and there are houses along the parallel roads that must have a big noise and visual problem. At this stage, the road is named "Country Way".
After a few more junctions we leave the delights of Hanworth behind us, and the road (which is by now elevated) passes Dairy Crest building on the right (look out for the cows on the roof!) and the grand-looking Metropolitan Water Works on the left. It descends just before Kempton Park, where there is a right-hand bend and we can see the blue signs of the M3, which takes up the baton at Sunbury Cross and becomes the main road to the South West. Non-motorway traffic has to make do with the A308.
Named Junctions
| Image | Name | Classified Road(s) | Grid Reference | More Info | Map |
|---|---|---|---|---|---|
|
Hogarth Roundabout | A4 | TQ213779 | ||

|
Chalkers Corner | A205 | TQ196759 | ||

|
Manor Circus | B353 | TQ188757 | ||
|
|
Richmond Circus | A307 | TQ180754 | ||
|
|
St Margaret's Circus | A3004 | TQ165745 | ||
|
|
London Road Roundabout | A310 | TQ159743 | ||
|
|
Whitton Road Roundabout | B361 | TQ155741 | ||
|
|
Hospital Bridge Roundabout | B358 | TQ136728 | ||
|
|
Apex Corner | A305 / A312 | TQ126721 | ||

|
Sunbury Cross | M3 / A308 | TQ099701 |
| A316 | |||||||
| |||||||
| |||||||
| |||||||
| |||||||
| |||||||
| |||||||
|


